

Now there are those out there that live and die by that green furniture foam, and those who say you have to go with a closed cell foam that won't deteriorate, grow mold from moisture and can get wet... Well, if you want to go and spend a couple hundred bucks more sure you can go with the good stuff. But like many of the hobbyist costume makers out there, like myself, the furniture foam is the only way to go.

If you watch for coupons online and through the Sunday papers, you will find 40%-50% coupons all the time for Joann's fabrics. They have various sizes of the foam ranging from 1/2"-4" thick. And when you can cut your foam budget in half this really is the way to go.
There are plenty of great tutorials on YouTube.com and Instructables.com on how to carve foam. But my favorite is the electric carving knife. These can be found at thrift stores and garage sales for next to nothing. There are cordless versions available new would work better but i use my trusty old one that I have had for years. And when it comes to putting it all together, I am using hot glue. In the past I have used everything from foam spray adhesives to contact cement but I always go back to hot glue. It seems to work the best. This time I invested in a cordless hot glue gun. With a project as big as this it is easy to get tangled up in cords. And it is very handy.

Making a curve can be as easy as taking a notch out and gluing it together, but you have to consider some math. Take this little example. I want a width of 40" around the middle but I want 30" at the ends. I need to cut out 10" in wedges. If i don't need it to be perfectly smooth I can take out 5 - 2" wedges, or to for a cleaner curve i can take out 10 - 1" wedges. The length of your wedge is also important. the longer they are the more gradual the curve is. Another factor to think is as your foam curves down you lose length. I forgot most of geometry from high school, so I would add the width of the wedge to the length of the foam to compensate for the length of the foam. It worked great for me. With a 5 inch long wedge, with a 1 inch wide wedge, I would add 1 inch the total length of my foam.
One thing that I did remember was how to calculate a circumference using our old friend Pi (or to make it simple 3.14) Using the Diameter x Pi = Circumference or Radius x 2 x Pi = Circumference. This came in handy for the thighs, which I had no tube frame for. I wanted the thighs to be about average about 15 inches wide on the inside, so 15 x 3.14= 47.1 give another inch because I was using 1 inch thick foam, you have 48" to go around the thigh. Foam comes in a 24 inch sheet, so with the 1 inch wedges on top and bottom, I expect the entire length to be 20-22 inches. Once you figure out this math you can easily calculate the total coverage of foam that you need.

Now all of this said, some of the pieces did take some re-work, once the whole body was done its best to stand back and look at your work. Squint your eyes and try to picture the complete project. For this one I went back and adjusted the thighs and forearms and I still might go back and adjust the calves. This is another reason why I started the project 9 months in advance.. I want to get it right!
Oh and if you have a shop vac, you will find yourself cleaning up little green shavings EVERYWHERE. Just look on the ground in any of these pics, you will see these. But don't trash every trimming, I found out that when I had to make a modification some of these little wedges came in real handy. When I post about the head you will see how many of these created the structure of the head without needing to go with solid foam!


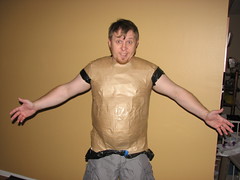


 The photo above is an early version of the Empire Strikes Back


